22
Formula 201 – #2 Using Parameters and Primary Series
 One of the very important aspects of indicator is using parameters. Parameters are information provided by you, the user, to modify the behaviour of the indicator. We will walk through the basics of defining parameters, and then we will take an overview of accessing primary series information.
Our Second Indicator
Similar to the first indicator we worked on, we are going to define an indicator that computes a form of the typical price. This time though, we will use parameters to control the percentage weighting for each of the open, high, low and close prices.
Just to remind you what we have done in the first tutorial, here is the formula we used,
plot1 := (o + h + l + c) / 4
We will now work on defining our second indicator.
Adding Parameters to Our Indicator
Following the 4 steps of indicator writing, we have to first create the script.
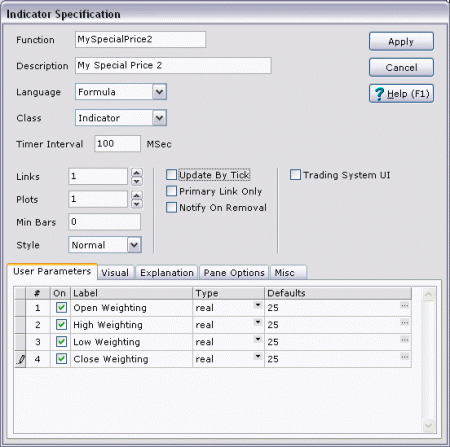
Then we will fill in the information in the Indicator Specification window.
Notice that there are 4 parameters in the User Parameters tab.
To add a parameter, you can right-click in the User Parameters table, then choose from the popup menu the Add command. That will add a new parameter to the end of the list.
For each parameter you defined, you can give it a name, set its type, and provide a default value for the parameter.
The name of the parameter is displayed when you add an indicator to a chart through the Add Indicator window. It is a useful way to remind yourself or the user of the indicator what this parameter actually specifies.
The type of the parameter controls several different properties related to the use of the parameter.
First it helps NeoTicker properly interpret what your parameter means. For example, if the parameter is of type date, it is not handled the same way as a parameter of type color.
Second, it helps NeoTicker providing you with the extra tools you need when you add the indicator to a chart. In the Add Indicator window, it has the ability to provide extra editing tools to assist you entering the values you want. For example, a parameter of type time can use the time editing popup window to enter time easily.
Third, parameter type helps NeoTicker pre-check the correctness of a parameter. For example, a parameter of type integer should not contain any characters that are not numerals.
For the purpose of this indicator, we need 4 parameters to specify the weighting of each component we are going to use in the formula. These parameters are all real values.
Once you completed filling in the information in the Indicator Specification window, you can press Apply to proceed.
Available Parameter Types
If you are interested to know more details about the various parameter types, you can take a look at this section. Otherwise, you can skip to the next section.
Here is a brief description of the available parameter types,
string – the most generic parameter type, no syntax checking is performed on this type.
real – user input is interpreted as a real value (also known as floating point value).
integer – user input is interpreted as an integer value.
integer.gt.0 – user input is interpreted as integer and syntax check enforces that the value has to be equal to or greater than 0.
integer.gt.1 – user input is interpreted as integer and syntax check enforces that the value has to be equal to or greater than 1.
datetime – user input is translated into a real value representing date (integer portion) and time (the fraction portion). Datetime entry support will be displayed when necessary to assist the user.
date – user input is translated into an integer value representing a date. Date entry support will be displayed when necessary to assist the user.
time – user input is translated into a real value representing a time. Time entry support will be displayed when necessary to assist the user.
formula – user input is not checked at all. Formula editor will be displayed when necessary to assist the user.
color – user input cannot be checked. Color selection popup window will be displayed when necessary to assist the user.
Writing the Code
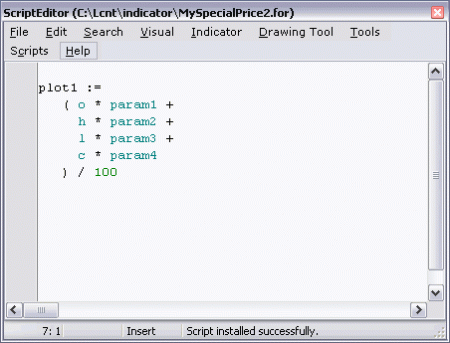
The original formula from the previous tutorial is now modified as follows,
There are 2 interesting points about the formula language.
First, it is not sensitive to formatting. You can type your formula anyway you like as long as it is syntactically correct.
Second, it is not case sensitive. Thus no matter you type in param1 or Param1, both will be recognized by NeoTicker that you are using the value of parameter 1.
Let’s get back to our one line indicator. We are still working on an assignment statement that assigns the right hand side expression to the predefined variable series plot1.
The expression is no different from the normal arithmetic expressions we have seen in school. It follows the same rule of priority, thus multiplication * is done before addition +. In order to force a part of the expression to be evaluated before the other parts, we need to use the round brackets (...).
The parameter functions param1, param2, param3 and param4 are used to access the values provided by the indicator instance. Thus if the user override the default values when the indicator instance is added (e.g. when you add an indicator to a chart), the indicator will return those values provided by the user when the parameter functions are called.
Parameter functions take the form of, ParamN, where N is the position of the parameter in the parameter list. If you use a parameter function that is not actually defined, a runtime error will be resulted. For example, if you use param5 in our indicator, it will result in runtime error because we have not specified enough parameters in the Indicator Specification window.
The data series functions o, h, l and c used in the formula are the short forms of the regular data series functions. Here is a list of the regular data series functions.
Open (BarsAgo)

High (BarsAgo)

Low (BarsAgo)

Close (BarsAgo)

Volume (BarsAgo)

OpenInterest (BarsAgo)

Date (BarsAgo)

Time (BarsAgo)

DateTime (BarsAgo)
When BarsAgo equals to zero, it is optional.
The short forms of these functions are, O, H, L, C, V, OI, D, T, DT.
These functions let you access the specific fields of the primary series. The BarsAgo parameter allows you to reference to previous values of the fields offset by BarsAgo from the current bar. For example, h (1) is the high of 1 bar ago.
This style of data access is called At the Point Evaluation which has many advantages including much more compact and cleaner code writing. We will spend more time on this topic in the future. For now, you just need to know how the data series functions work.
For those of you familiar with the quote formulas, you will find that there is no Series Descriptor parameter for these functions. The reason is that it is not necessary – as the indicator is linked to the series you have in a chart, or provided by you in the quote window, the only series these functions can refer to is the primary series.
Once you finish entering the formula, use the Indicator menu>Install to complete the installation of the indicator.
You can also download the indicator My Special Price 2.
Using the Indicator in a Chart
Let’s create a chart and add our indicator to the chart for a test.
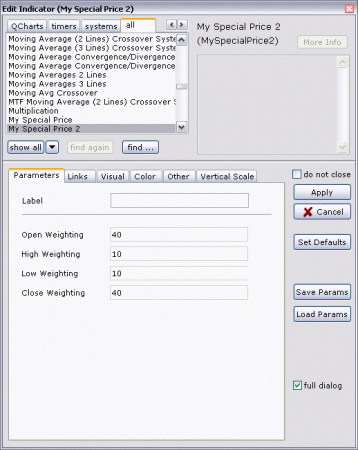
The parameter names that we typed into the Indicator Specification window is now showing right there.
I have changed the parameters from the original defaults to a different set of weightings.
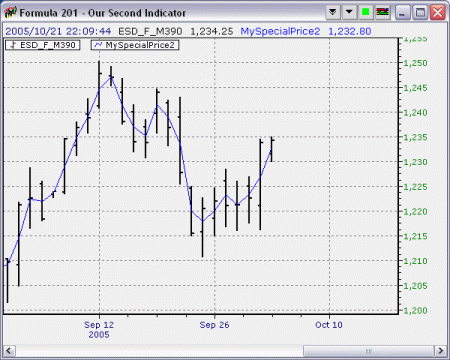
You will get a chart similar to what I have here.
Using the Indicator in Quote Window
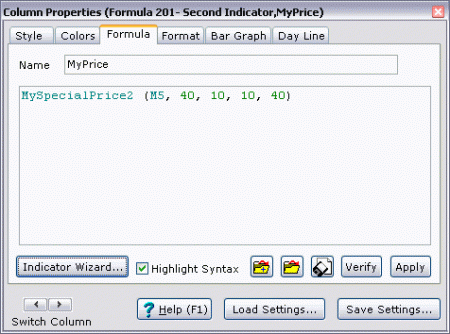
To use the indicator in the quote window, you will need to provide the parameters right there within the quote formula.
Here is the quote window with our indicator.
Summary
Parameters are core to the design of any indicators. It provides a way for the end user of your indicator to customize the behaviour of the indicator in a way that fit his/her usage.
Primary series is the main data series that any indicator is designed to work on. I have covered the basic functions that you need to access that information. How to further utilize this information will be the main topics in the future tutorials.
Exercise
We have not covered enough material yet. It is likely we will have some exercises by next tutorial.
Share: digg | del.icio.us | Technorati | StumbleUpon
